Building an Alpaca Enclosure
- Jennifer
- Mar 17, 2023
- 4 min read
Once our chicken coop was completed enough for the season, we moved onto building an enclosure for our alpaca. While sheep and alpaca can be kept in the field with 3 sided structures for protection from the elements, they're vulnerable to predators. We decided that we would keep our animals inside enclosures at night at least. Because our barn has a plywood floor, it's not suitable for keeping animals. Unfortunately, taking out the floor of our barn would have significantly impacted its structural integrity. We decided instead to make the lean-tos on either side of the barn into the animal nighttime enclosures. Because our sheep were fairly safe in their current temporary enclosure, we went to work on the alpaca enclosure.

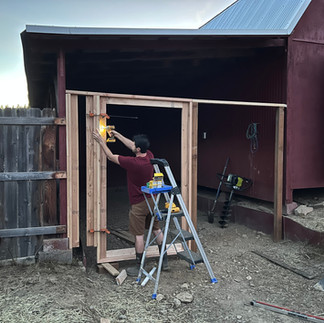
First order of business was to clean out the area and remove anything we didn't want. Unfortunately, we didn't take a photo of the area before it started, but this is basically what it looked like minus the tools. There was a decent amount of not quite trash that we nonetheless ended up trashing like fencing, blocks, plywood panels, and bricks. We did save some things like the t-posts and pavers for future use.
Next, we built a gate and closed off the front of the enclosure to keep the alpaca in.
After much deliberation, we decided to build the gate and fence from scratch. We decided to use 4ft no climb fencing as the panels of the fence. Once we settled on that material, Brandon built the gate, which was used to as a spacer for the support posts.


Turns out that setting a post in concrete isn't too hard as long as you're able to dig a good hole. There were a bunch of rocks which would stop our cordless electric auger from digging. The post hole digger is next to useless in my opinion, so we broke out our other shovels to dig the rocks out. The post multi-level made getting a nicely level post so much easier than a regular level. We reused old fence boards and nail stakes to stabilize the posts until the cement hardened.
We used two 8 foot boards to build a header, and then built the rest of the frames. We used a scrap piece of 4"x4" post to support the smallest wall section. Since we used non-climb horse fence to build the panels and the gate, each large section was a little over 4 feet wide. We were left with a small section, which was too thin to do much with. We decided we'd try to put a decorative element there with a sign in the future. Hopefully not too far in the future, but knowing us, it'll still be a funny looking gap in 5 years.


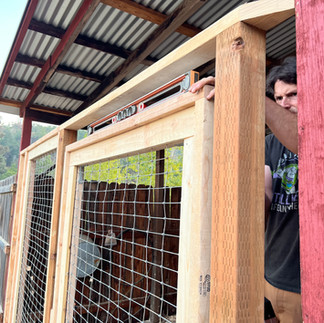


We used large gate hinges and a 2 way gate latch for the gate. The latch is easy to open from both sides. It's a pull latch on the inside, and the alpacas have not figured out how to open it. I'd like to figure out how to automatically open the gate at sunrise in the future.
Our next step was to predator proof the enclosure. It's a little different than predator proofing a chicken coop. We're mostly concerned about large predators like mountain lions, coyotes, and possibly bears.
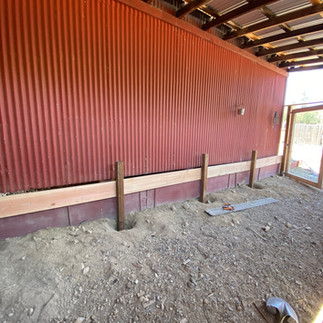
There is a fairly large crawl space under the barn. After hearing about a mountain lion digging under the fence of a local alpaca farm and killing 3 of their alpacas, we felt a bit paranoid that could happen with our animals. We installed 4"x4" posts next to the retaining wall, and attached 2"x10" boards along the backside to made the gap too small to crawl through. A bird can still get through, but they don't seem to bother with it much. As an added bonus, we can use the rail for hook over feeders which we use to hold minerals and to give alpacas treats at night.


At the top of the outside wall, we installed hog panels using fence staples. We debated using non-climb fencing to match the doors, but we quickly realized it would be hard to get the look we wanted. Woven wire fencing requires tension to be straight and that would have been way more complicated than just cutting hog panels to size and stapling them in. Brandon dragged the panels to the area using his tractor. He likes to say, "Smarter not harder," but I think he just wanted an excuse to drive the tractor. We had to cut one of the panels down, but it was a quick and easy solution.


On the bottom of the outside wall, the fence boards seemed loose and possibly easily to dig under. We removed as much as from the ground including removing the truck of a dead shrub. We then attached left over 2"x10"s and 2"x6"s along the bottom using 2"x4" scraps. A few fence boards were loose at the back of the enclosure. We're planning to eventually replace the boards, but it doesn't appear to be a safety risk at this point. The spaces are too small for large predators, and there is a small madrone tree blocking the other side.


We washed the inside with a cordless power washer to clean off years of dust. Then, we set up an automatic waterer and a hay feeder using a fence panel with 4"x4" openings.


Long term use modifications:
The gate sagged after a while so we added an anti-sag brace. The gate seemed to swell and tweak during rainy season so we added a cross beam.


We used non-climb horse fence for the gate and the wall. It had the look we wanted, but turns out it doesn't hold up very well to alpacas rubbing on or bumping into it. We're going to replace them with rigid wire panels eventually.

Well done, and this will keep the alpacas safe!