Refurbishing a Chicken Coop
- Jennifer
- Aug 6, 2022
- 7 min read
Updated: Aug 22, 2022
Our farm came with an old chicken coop, but it hadn't been used for years, probably decades. The core structure was useable and large, but it needed a lot of work. I naively thought we could finish in a week... That was a HUGE, laughable underestimate of how long it actually took.
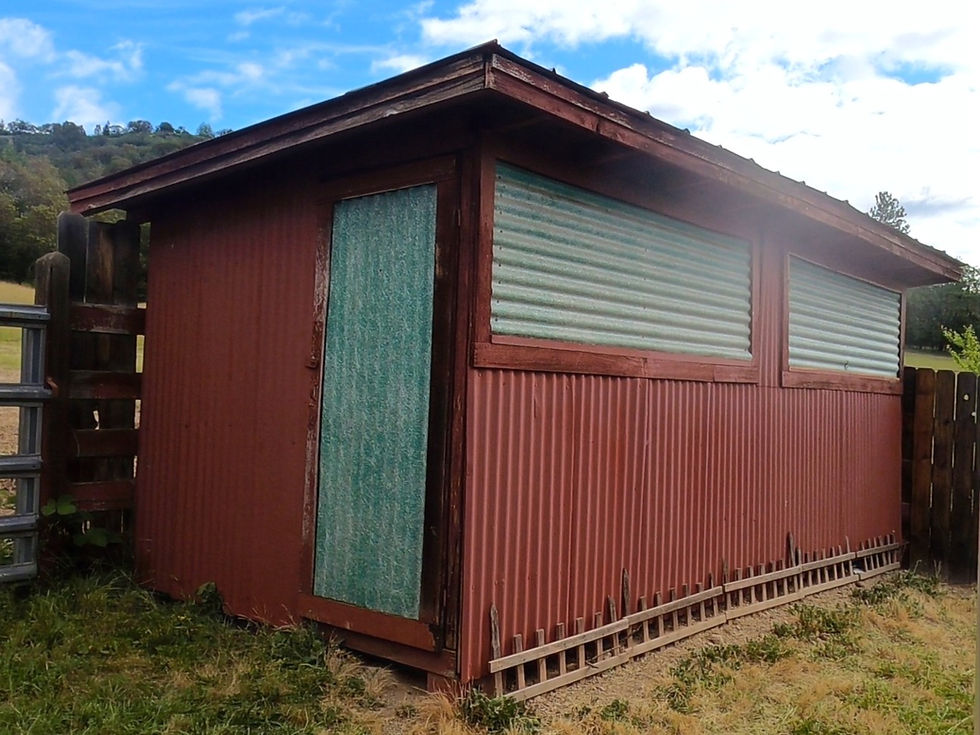 |  |
Our first step in transforming the coop was to remove everything we didn't want inside and out: metal siding, green window covers, broken windows, the flooring, blackberry canes, and wasp nests. Then we had to add the things we did want: hardware cloth over the windows, maybe replace the door, chicken wire flooring for protection, nesting boxes, automatic door, and roosts. Sounds simple, right?
Well... removing everything took a long time, a little over 3 weeks. To be fair to ourselves, we only were able to work on this a few hours a day since we also were moving to the farm at the same time.
Part 1: Chicken Coop Deconstruction


Day 1, we ended up only removing panels on the front side and mostly removing all blackberry bushes around the coop. It quickly became clear to me that this was going take a lot longer than I had originally hoped for.
We learned a lot this day about tearing out the siding and got better over time. It was still slow going, and a lot more manual labor than I was used to. Luckily, the weather was beautiful, and the skies were clear. We enjoyed working outside late into the evening.

 | Getting the floor out was a beast. There were 2 layers of flooring. The top layer was a very dusty layer of particle board, and the bottom was 8 foot long boards. Underneath those, there were the boards that supported the flooring. |
 | Brandon ended up cutting the boards because they were so long and hard to pry out. We left the support beam that went the length of the structure, but everything else went to the trash pile. |
 | Rowan got a kick out of helping out. He wanted his own work gloves, and his favorite tool was the pry bar. Not sure if he slowed us down or made it go faster, but it was fun having him out there with us with his non-stop kid commentary. |
Part 2: Construction
This is the fun part. We get to build my ideas into reality. I come up with the basic design, and Brandon figures out how to make it happen.
First, we attached 2" x 12" pressure treated boards to the bottom of the coop walls. They wide boards both provide some protection from predators along the bottom of the coop, and they also increase the structural rigidity of the coop since we had ripped out all of the flooring. We left one of the original supports that went the whole length of the coop, and we cut the 2" x 12" boards around the support beam and concrete blocks.
 | After a discussion about effort vs benefit. we elected to cover the floor of the coop with chicken wire instead of skirting the coop with buried hardware cloth. One reason is we have lots of ground squirrels, and they can easily dig up into the middle of the coop from far away. The other reason is that digging out from the coop would be a lot of work, and we needed to move our chickens in quickly. |
We used a piece of scrap wood we found in the barn to strengthen the staples in the middle, which seemed like the likeliest weak point. The wall with the entrance was the weakest, so we reinforced it with extra boards. After we buried the chicken wire with dirt, I had planned to move left over piles of compost in our backyard into the coop. However, since we hadn't yet moved our wheelbarrow to the farm, it was taking way too long. Instead, I sacrificed a partially used bale of hay. |  |
 | We installed my favorite automatic chicken door and a single roost in the back of the coop. It's resting on the wall supports and is held in place by scraps of wood. The roost is not screwed into place so I can easily remove it as needed. We also put hardware cloth on the open windows, made a new door frame, and covered it in hardware cloth as well. We ran out of our nice black vinyl covered hardware cloth, so we left one of windows. Since we had moved into the farm, we were rushing to get the coop safe enough for our chickens who were still living in our old house. |
We moved them after dark because it was easier to grab them off the roosts, and because we worked until late to put the last safety touches on the coop like covering large holes in the walls with scraps of hardware cloth. The coop was pretty barebones, but it had food, water and safety for the chickens. Since the single roost was high up, I had to put the two chickens who couldn't fly up there every night for a while. We did end up adding a temporary shorter roost to help the chickens get to the tall roost. Unfortunately, it still didn't help our silkie. |  |

The roof of the chicken coop is pitched towards the north, so we had to make a mount for the solar panel for the automatic chicken door.
Now that their basic needs were attended to, the next step was adding nesting boxes. I had expected them to stop laying eggs during this transition, but to my surprise they continued to lay daily. They were laying eggs all over the floor of the coop, and they were dirtier than I'm used to.
I made some drawings of what I wanted and how I thought we should build it. Brandon took my basic ideas and made modifications to make the build easier or more structurally sound. On this, our second chicken coop, I decided I wanted the access to the nesting boxes to be on the back side instead of the lid. Lid opening is more complicated to build. Also, the roof can be heavy, and it's awkward to hold the lid up, hold a basket, and grab the eggs. Having the access door drop down has turned out to be easier to manage. Plus, it's easier to lock. Once the nesting boxes were semi-built, we cut a hole in the side of the coop and installed them.


Underneath the nesting boxes, we expanded the footprint of the coop. This area was built with the same basic standards: 2" x12" boards along the base and chicken wire lining the floor. The purpose of this area is to eventually be a brooder area, and we added access doors to the area from the outside for easy cleaning.


Lavendar, our silkie, supervised the construction. I think she approved.


Another detail we added was a little gap between the front board that holds the nesting pads and the floor of the nesting box. My hope is this will help us clean the nesting boxes by allowing water and debris to flow out in 2 directions. I like to use nesting pads because it holds the nesting material in place, and the eggs usually are pretty clean. However, you have to make sure there aren't any droppings on the bar in front of the boxes to get their feet dirty.
Once the nesting boxes were in, we moved this year's chicks and ducklings to the coop. They roosted around the nesting boxes for a few days, and I grew tired pretty quickly of cleaning out the nesting pads every morning. They made the brooding area pretty dirty, too. I don't like having extra cleaning to do. That's what the deep litter method is for!


We added more roosts to the coop all spaced 18 inches apart horizontally: a 2nd high roost, a mid-height roost, and a small and short roost to use as a ladder. We placed the roost bars in sort of U-shaped channels to make them easily removeable. That's come in handy when I had to catch the adolescent ducks. I moved the roosts out of place so there was no place I couldn't reach.
The 2nd high roost is there to reduce fighting. More chickens are able to be the same height and out of pecking range of chickens on the 1st high roost. The ladder of roosts worked for our silkie, Lavendar, to finally make it to the top! She's able stay out of range of the other hens who used to bully her off the first bar. She became the top chicken on her bar, just over all the babies who stay out of her pecking range.
We completed the interior set up of the coop with a large feeder, an automatic waterer, and a feeder for oyster shell. This feeder is made using Rent-a-Coop's DIY Chicken Feeder Kit and a large storage container. I like how easy it is to see how much feed we have left, and it's super easy to fill. We filled it 2/3 full with a 50lb bag of crumbles, and a few days later (growing ducks and chickens eat a lot!), we added another 40lb bag of crumbles.

The waterer was brought over from our old house, and we set it up the same way as last time. We repurposed our one of our old feeders for oyster shells, and the other for alfalfa pellets. I read somewhere that ducks will eat alfalfa pellets to prevent angel wing deformities. Ours are beyond that stage now, but they might still enjoy having them.
Part 3: Fence - an unexpected addition

This time around, I wanted to make sure the deep litter method developed into a more active compost. I'm not totally sure, but I think it didn't heat up last time due to lack of moisture in the coop. To remedy this, I put the waterer in the coop and planned on feeding the kitchen scraps inside the coop instead of in the yard. I thought it would also keep the dogs from eating the scraps. Turns out, my dogs (and lambs) were able to go through the chicken door. They may look fluffy, but apparently underneath all that fur are tiny things.
Even at 7 months old and about 65 lbs, our livestock guardian dog Aspen is able to still crawl through the door. He may look ridiculous doing it, but he doesn't care when he has a goal in mind. Much to my dismay, Aspen started chasing our chickens right around 6 months old. He had been a gem up until then, but I guess his energy level and instincts started kicking in. He chased them all the way into the coop, and they chickens couldn't get away from him. In the last month, he has unfortunately killed 6 of our adolescent chicks so we built a fence to keep him out of the coop.

We loaded up our trusty mini-van with enough materials to start the fence. In there we have 3 2"x4"x10's, 5 2"x4"x8's, 36 2"x2"x3's, 12 16" concrete landscape blocks, a bag of cement and a few other small things we needed. It was a lot more weight in the back than the mini-van normally carries, but it did the job.

Brandon used the tractor to transport the materials from the driveway to the coop area. He was pretty stoked to not have to manually carry all those blocks the whole distance.
We first installed some posts reclaimed from privacy fencing on the property that was falling down. It was also unnecessary since there was also a chain-link fence that was still standing strong. This was our first time using concrete, and it seemed pretty simple. The next morning, the posts were solidly in place.

About 15 trips to Home Depot later and a lot of sweat, we finally had a fence. We intentionally left spaces 6-8 inches high so the Muscovy ducks could crawl under them. Once they're able to fly, we might make the gaps smaller to keep the house dog out, too.


Part 4: Paint, trim, stain and decorations
 | Painting the coop was interrupted by needing to build the fence. We elected to not get a paint sprayer to save some money, and I regret that decision. Painting the rough boards is a royal PITA, and the coverage is not great. We used a roller & a brush. Have you every painted a ceiling? That's what painting the top of the coop was like. It was not fun at all. There were lots of cracks that we weren't able to fill in with the brush. As long as you don't look closely, it looks great! lol. |
 It was also the hottest part of summer, and we had 2 hours every evening before sunset when the weather was bearable enough to work. |  |
We intended to just trim everything with hardware cloth for structural integrity. However, everything that was trimmed looked so good that we ended up trimming everything. We reused some fence board from the same piece of fencing we got the 4x4s for the gate posts from for the bottom trim. It was still gray after a power wash, but the 2 coats of semi-translucent cedar stain made everything look fairly uniform. We tried to re-use as much wood as we could from around the property. Unfortunately, some of it was stained with a substance that was not washing off, and it still looked dirty under the stain. Those boards went to the dump.


We bought a kit to build the door which was designed to make a gate easy to build. Brandon had lots of problems getting everything flush due to the design and a bent 2x4 from our initial rush build of the door. We had to go back to Home Depot for more wood and got a new 2x4, which made the door much straighter. Because of our plan to trim the doorway and the door, it turned out that we couldn't use the built in hinges and still open the door all the way flat against the wall. The hinges had to be cut off, and we installed new hinges on top of the trim. I think they look better overall.
We've added a temporary layer of gravel to the nesting box step and buried the irrigation line. It helped cut down on the dust in the area.
We're pleased with how the chicken coop turned out. It really makes the whole area look and feel nicer. While it's still not 100% complete, we've decided it's good enough for us to move onto the next project: the alpaca shelter.
Still to do:
Build up the ramp so that ducks can go through the door more easilY
Add a crush gravel layer to the steps and the ramp.
Grow ground cover (likely creeping thyme / mother of thyme)
Add shingles to the nesting box roof
Finish painting the overhangs
Redo the roof
Add a gutter and a rainwater collection system
Love your chicken coop, the new vlog and entire website! It's not only interesting, it's educational and very pleasing to the eye! You guys did a fantasatic job! Looking forward to eggs and veggies! Last year, the eggs and veggies were delicious and I especially loved the FGR stamps on each egg! (Shows how much love and work goes into everything you guys do)! Bravo!
Terrific! So much work done, and it certainly SHOWS! So well done!!
Love this snapshot of how you accomplished this task and watching the little farm of your dreams come to life!! So excited to follow your journey.